It seems like the most common way to create users in powershell via the ad module is by using the “import-csv” command and then running a foreach-object on new-aduser.
I got the original script from a couple of people on reddit and some blogs on Google. There’s not much uniqueness to it besides taking the first character of the variable which I explain at the bottom of the post.
This is my first time doing it but I’d like to outline the steps. I have two simple goals:
- create bulk users
- add users to a group based on their “grade” (these are student accounts)
The way I have my excel workbook setup is I have 3 columns: givenname,surname, grade.
Based on the users grade they will be added to the appropriate security group.
The first step to doing this is (if you’re working with a .xlsx file) export the file to a .CSV
Now we can begin writing the script…
Import-csv .\importusers.csv
The line above obviously imported the .csv so we can work with.
Import-csv .\importusers.csv | foreach-object
After we import we our csv we need to add a pipe “|” to continue operations, we’ll add the foreach-object command, which will run a certain script block for each object (each item in a certain row under a certain column)
Import-csv .\importusers.csv | foreach-object {
$samaccountname = $_.givenname + $_.surname
$userprinicpalname = $SamAccountName + “@yourdomain.tld”
$displayname = $_.givenname + ‘ ‘ + $_.surname$department = “Students”
The reason we use $_. is so we can declare that we want to work with the current object.
The reason we don’t use $_. for samaccountname while creating $userprincipalname is because it’s already nested from above so it’s always going to use the current object in the line.
So now we jave our samaccountname, userprincipal with our domain, and displayname.
note: for the display name i used single quotes with a space inside.
If you’d like to see how we can create samaccounts with just the first letter of the name browse to the bottom of the page.
Import-csv .\importusers.csv | foreach-object {
$samaccountname = $_.givenname + $_.surname
$userprinicpalname = $SamAccountName + “@yourdomain.tld”
$displayname = $_.givenname + ‘ ‘ + $_.surname$department = “Students”
New-ADUser -SamAccountName $SamAccountName -UserPrincipalName $userprinicpalname -Name $displayname -DisplayName $displayname -GivenName $_.givenname -SurName $_.surname -Department $Department -Path “OU=test,DC=north,DC=local” -AccountPassword (ConvertTo-SecureString “Password!1234” -AsPlainText -force) -Enabled $True -PasswordNeverExpires $True -PassThru
add-adgroupmember $_.Grade $samaccountname}
Now we use new-aduser to create the accounts. Some people like to have a variable for -Path but I want them all to go into the same place. One thing you need to be aware of is if you want your users to go into an OU you need to make sure the path begins with OU= and not with CN= . For example if I want my users to go into the default Users container I need to begin the path with -path “CN=Users,DC=North,DC=local” since my domain is north.local. Now in my code example above I use -path “OU=TEST,DC=north,DC=local” because I want these users created in the OU “test”. It’s a small difference but will break the script if you don’t realize it.
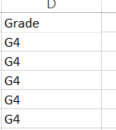
And finally I want to add my users to a specific security group so I created a column like the screenshot below…

Now every time the script goes to the next object, it gets the grade with $_.grade and adds the user it just created to that grade.
The below example is if we want the account to be first initial + lastname. My CSV looks like this.
![]()
The $givennameshort is optional it just takes the first letter of the givenname from the .CSV so we can have first initial and lastname as the user account.
Now we can add that to a variable to produce a samaccountname and userprincipalname like below
$samaccountname = $givenshortname + $_.surname
The reason why we don’t require a $_. because it’s already nested (for a lack of a better term) in the variable.