Explore all the pros, cons of the Synology DS220+, a powerful 2-bay NAS that has all the features that you need to run dozens of useful apps, store all your multimedia library while streaming it, and much more! It can even assist in running a small business’ file server.
With more and more media becoming digital, and data becoming what seems like a nearly tangible commodity, setting up a network attached storage (NAS) device at home is becoming common. A NAS will allow you to do a multitude of things from home, all while storing your data and keeping it safe. Not to mention the ease of deploying the Synology DS220+ NAS can be done by anyone, it’s that easy! Let’s just straight into the review of this device.
Table of Contents
The Pros and Cons Of The Synology DS220+ NAS
Here’s a quick overview and list of all of the pros and cons that we put together as to why this NAS is worthy of purchase:
PROs
- Design and Materials – This NAS unit is sleek and made of a strong, but light, plastic. The disks are held in place firmly with no risk of movement once installed.
- Easy Installation – A tool-less installation method for HDDs allows for quick and easy install, and the sliding cradles are a nice touch.
- User-Friendly Interface – We actually love DSM – DSM feels more like an extension of Windows or Linux than it does an independent OS, making navigation more friendly than other NAS UIs.
- Extensive Customization – Nearly all aspects of the DSM OS are customizable, allowing for the unit to be completely tailored to your needs.
- Upgrade-able Hardware – The machine allows for additional RAM to be installed (up to 6GB, non-ECC, from the standard 2GB) and the cooling fan can be replaced if inclined to change the hardware.
- Countless Applications – Many applications of all types are available in the Package Center, allowing all sorts of operation from file storage, to media streaming, and even surveillance systems.
- Redundancy and Speed – The Synology DS220+ has 2 drive bays for easily configuring RAID 1 (redundant) or RAID 0 (combining for speed) within 2 minutes of logging in.
- BTRFS File system – The recommended file system for Synology NAS units is BTRFS, it features snapshot capabilities, versioning, quotas, and much more.
- 2x RJ45 Ethernet ports with Aggregation – For those of you a little more tech-savvy, you may want to experiment with configuring link aggregation to achieve a 2Gbps of bandwidth (aggregated, not for single connections). Or you may decide to connect 1 port to a virtualization host, and 1 port to a network switch for isolating the traffic.
CONs
- Only 2 drive bays – When initially purchasing drives for the 220+, you need to go for the more expensive ones because you only have 2 drive bays. We recommend 4TB as a minimum because you’ll most likely be configured them in RAID 1. This means that 2 4TB drives will give you a total usabe storage of 4TB.
You can purchase the NAS from Amazon below:
What’s In The Synology DS220+ Box?
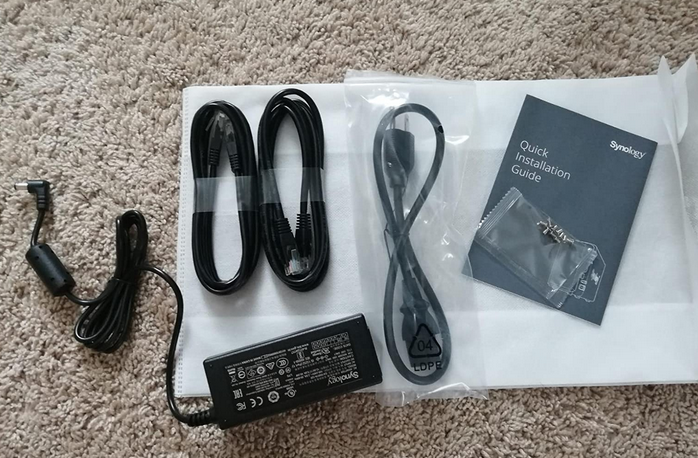
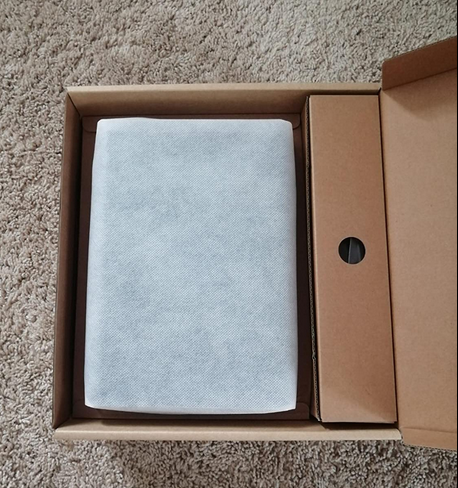
When purchasing this Synology NAS, you can expect to find the unit, the AC power adapter, 2 Ethernet cables, a bag of screws as well as the Quick Start guide. All of the cables and components are made of high-quality materials and should last quite a while without any problems, unlike cheaper alternatives that are prone to fraying. The unit is packaged securely in such a way that won’t allow for shifting or damage while in transport.
Physical Appearance and Design
The Synology DS220+ is a small, sleek package that lends itself to going unnoticed. The case comes in a matte black finish, and is made entirely out of plastic, making it fairly light, weighing in at less than three pounds with no disks installed. Small in stature, it measures around 6.49 inches tall, 4.25 inches wide, and 9.14 inches tall. It weights about 2.86 lb. It’ll stay tucked away nicely, out of the way in most any room.
The front cover is held on using four rubber grommets, eliminating the need for hinges or other hardware that may weaken over time. Synology’s approach using these grommets rather than plastic hardware is indicative of the two bay design, suggesting that if there is heavy data usage then the swapping of drives may need to happen consistently. No matter the intent, the design is simple and effective.
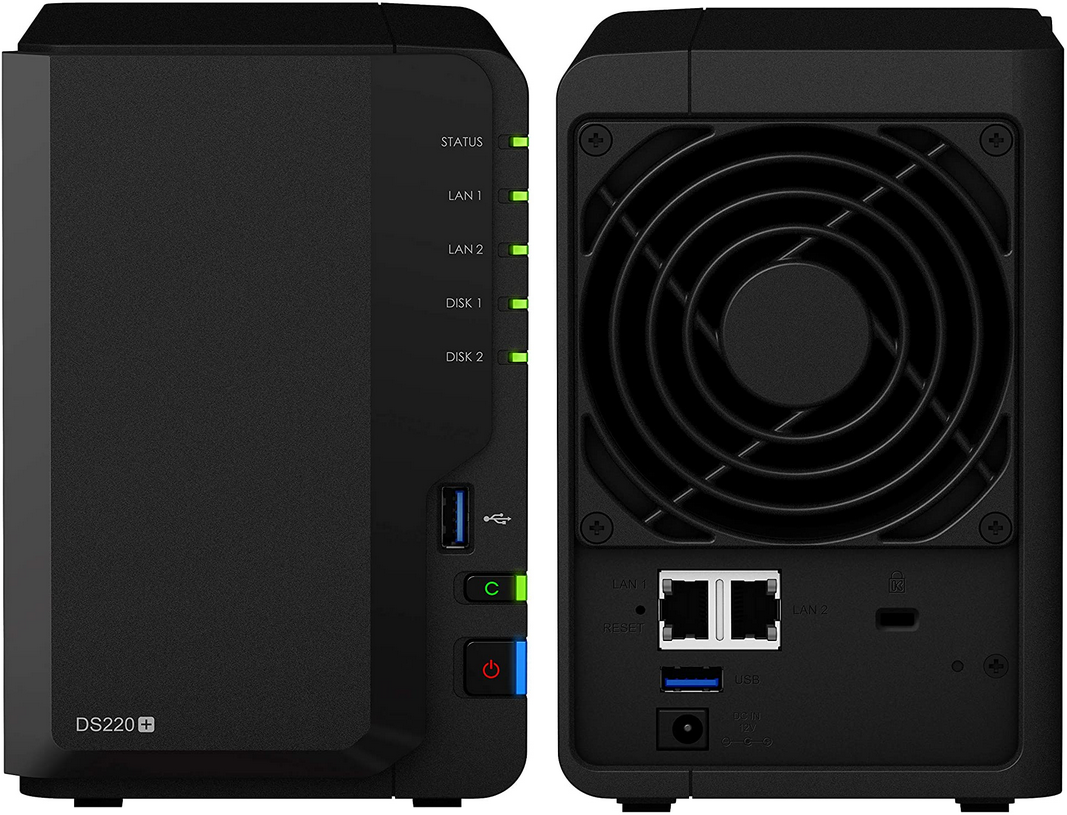
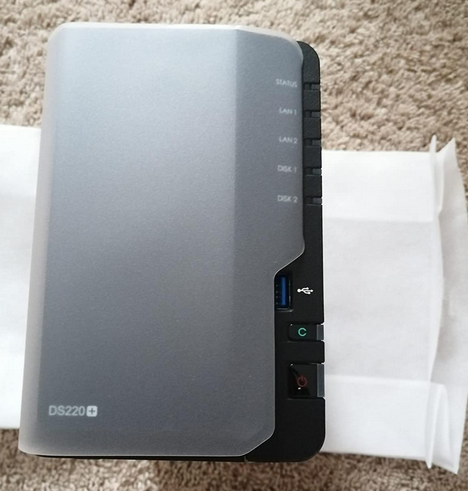
The Front Of The Synology DS220+
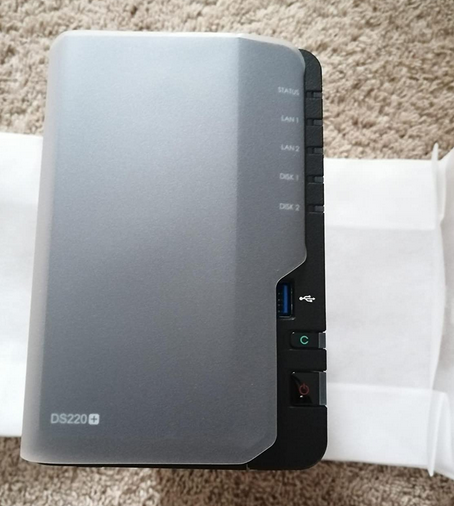
The front cover is held on using four rubber grommets, eliminating the need for hinges or other hardware that may weaken over time. In this picture we didn’t take off the plastic film on the front. When creating this NAS, the team had an approach using these grommets rather than plastic hardware is indicative of the two bay design, suggesting that if there is heavy data usage then the swapping of drives may need to happen consistently. No matter the intent, the design is simple and effective.
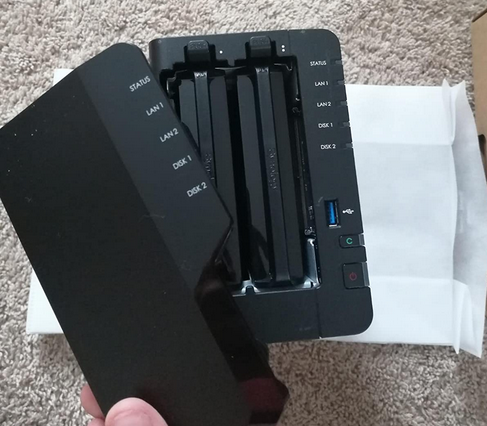
A Look Inside The Synology DS220+
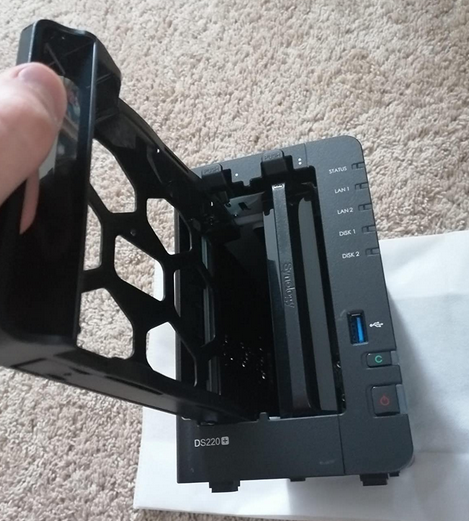
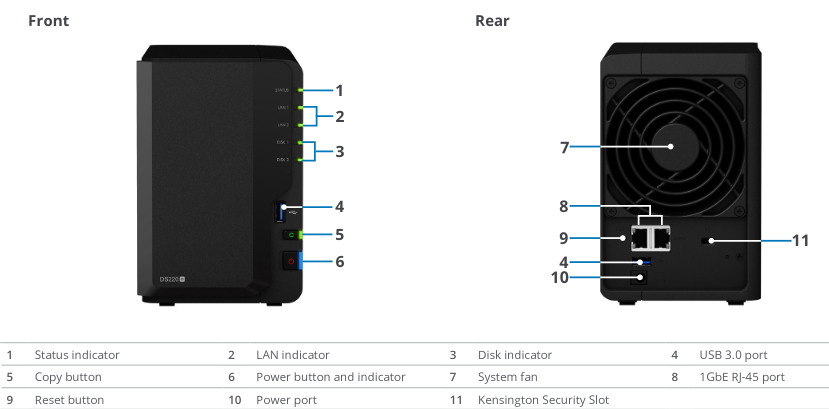
On the removable cover are the markers for the overall Status, the status of the 2x LAN connection, and the status of both Drives (Disk 1 and Disk 2). Underneath these LEDs one of the two USB 3.2 ports is situated, as well as a USB copy button and the power button and indicator.
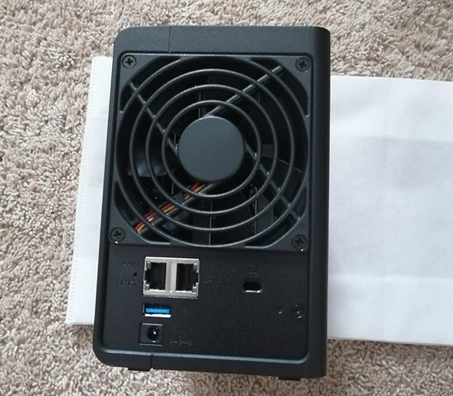
The Back Of The Synology DS220+
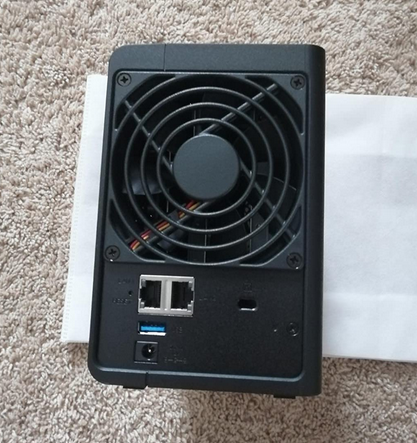
The rear of the NAS sports the huge, but quiet cooling fan, which sits above the USB port, Ethernet ports, and the power port. There is also a Kensington security slot, allowing you to lock the device up should you feel the need to. A physical reset button is also present, allowing you to reset the NAS to factory settings manually. The sides and top of the machine are fairly bare, except for the Synology logo. The bottom sports four rubber feet to keep it in place.
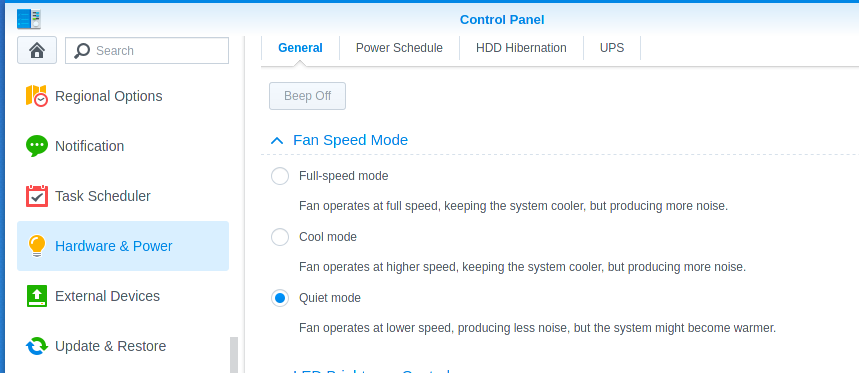
A Quick Tip About The Fan Speed Of Any Synology NAS
A problem often found in NAS products is the cooling fan. It’s either too loud, or not effective in cooling the NAS down. The Synology DS220+ does not falter in these areas whatsoever; it is quiet during operation and keeps the unit cool, even during intense operations. If for whatever reason, you find the fan is too loud, or the NAS gets too hot, you can easily control the fan speed from within DSM with these simple steps.
- Log Into DSM
- Launch Control Panel
- Go to Hardware & Power
- Go to the General Tab
- Choose between Full-speed, Cool, or quiet mode
See the below image for more details on the menu location.
A final note about the fan… Should the fan not meet a user’s standards, it should be mentioned that it can be swapped out, a nice detail not present on other entry-level NAS models. We personally feel that this is not required in this device as the current fan is quiet enough, but if you’re a hobbyist that loves to make things even more quiet we’ve got some tips for you. Just look for a 92x 92 x25 mm fan replacement.
Here are two fans we highly recommend that are super quiet, and push a decent amount of air.
The Noctua NF-A9 FLX takes quiet to the next level:
And the runner up is the Noiseblocker NB-BlackSIlentFan XE1.
The Tech Specs of The Synology DS220+
The Synology DS220+ is a two bay device that supports up to 32TB (using two 16TB drives) and comes with 2GB of RAM, expandable up to 6GB. This NAS features a design that eliminates the need for tools, and comes in a sleek package. See the technical specifications below:
- CPU – Intel Celeron J4025 64 bit dual-core 2.0 GHz which has a burst speed of up to 2.9 GHz. The bursting happens automatically.
- Plex hardware transcoding is supported for 4K
- Drive bays – 2 x 3.5 inch or 2.5 inch SATA hard drives or solid state drives.
- Memory – 2GB DDR4 (non-ECC), expandable up to 6GB
- External Ports – 2 x USB 3.2 Gen 1 (for regular usb devices like usb wifi adapters), 1 x eSATA (expansion unit)
- LAN – 2x Gigabit AKA 1 Gbps (RJ-45)
- Average power draw – When it’s serving files the power draw is about 14.96 watts.
Plex Hardware Transcoding With The Synology DS220+
Many of you may be looking at the Synology DS220+ for Plex video transcoding. Have no fear, this NAS is very capable of playing all the latest video codecs. Most of the below codes it can do in hardware, with the exception of H.265 in 10 bit, which it uses the raw CPU power for.
Video codecs supported for Plex hardware transcoding include:
Video codecs that the Synology DS220+ can play using raw CPU power include:
For exact numbers on how well the NAS does in Plex transcoding see below:
- 4K 2160p UHD with H.264 at 30 FPS
- 4K 2160p UHD with H.265 10bit at 30 FPS – Although this isn’t done in hardware, with low CPU usage, the NAS can still play H.265 at 10 bits. The only difference is it will play it utilizing high CPU power, which is just fine. It can play 8bit with very little CPU usage because it’s done in hardware.
As you can see with the above numbers, this device can play all of the codecs we discussed, even if it has to do it with raw CPU power, they will all play just fine!
Recommended Ram Modules For The DS220+
As we stated earlier, the Synology DS220+ comes with 2GB of DDR4 (non-ECC) RAM. This is usually enough for most people, and can definitely handle all of the functions of the NAS. With that being said, some enthusiasts still prefer to upgrade their NAS with more RAM to obtain faster loading speeds.
The DS220+ can be upgraded to 6GB of RAM. This allows for faster loading of DSM, more memory for certain applications like Containers or Virtual Machines, web servers and much more. Theoretically, the majority of apps should benefit from more RAM in the system because the custom Operating System caches as many objects as possible in memory, instead of reading them from disk. This provides much smoother response times.
More memory won’t accelerate every workload, for example file transfers probably are not limited by RAM quantity. Those bottlenecks are more CPU and network interface speeds.
With that being said, we personally always upgrade our NAS unit’s RAM modules because we are heavy application users.
Here’s the official, and recommended Synology RAM module:
Setting Up The Synology DS220+ NAS
Step 1, unbox it! The first step to installing the NAS is of course unboxing it, so go ahead and do that.
Step 2, plug in power and network cables! Next, plug in the power adapter, and Ethernet/network cable(s) into your home router or network switch’s LAN ports. Your Synology DS220+ comes with 2 Ethernet ports and cables, but you don’t have to use them. In fact, when setting it up, we recommend just starting off with one. The ends of the Ethernet cable are the same, so it doesn’t matter which end you plug into the Synology.
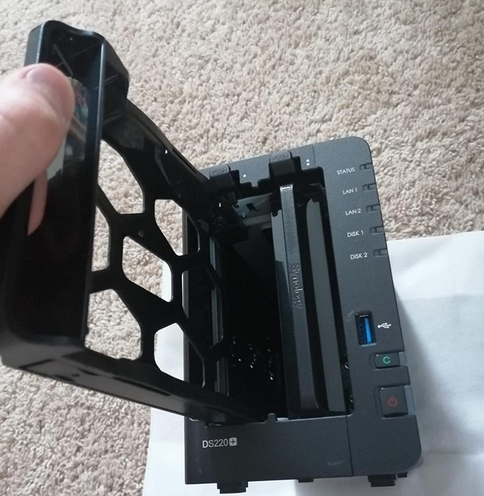
Step 3, install drives! Don’t power on the unit yet as we still need to install the disks. When installing disks, Synology took a tool-less approach, with two plastic cradles that easily slide in and out of the main body. To remove these cradles, you simply slide a plastic locking mechanism up and pull the tray out of the main body.
When installing your disks, there are two options available. If you are using HDDs, then the approach is still tool-less. The cradles are designed with plastic clips that keep everything in place quite well. If using SSDs, you’ll be utilizing the screws included with the kit to secure your disks into the cradle. The option for a tool-less approach is invaluable, and another genius implementation made by Synology. Then, once the disk is properly secured using the clips or screws, the cradle slides back into the housing and the ports line up perfectly. Installation only takes minutes, and anyone can do it. This makes the Synology DS220+ that much more appealing for the entry-level user.
Step 4, power it on! Finally, go ahead and click the power button on the front plate to get it booted up. To check on the status of your disks following installation, look at the LED panel on the front of the unit. If the LED for your disks are a solid green then the disks are installed properly and are in use, if it is orange then there is a drive error or the port is not being used.
Step 5, go through the setup wizard! After installing your disks and powering your unit on, you’ll be able to set it up. Go to your computer, open a browser, and go to the web address “find.synology.com”, with that, you can locate the NAS using any computer on the same network as your new device.
It should look like the below:

Once located, the software will take you through the steps to install the latest version of DiskStation Manager (DSM). When installing this operating system, it will format the disks that are installed in the machine, erasing all existing data on them. This is important to keep in mind. If you installed used disks, those will be wiped.
The installation is quick and painless, taking an estimated ten 5 to 10 minutes to complete. After it’s finished, you’ll be prompted to generate a server name (can be anything) and create an administrator account with password. From here you’ll be prompted to setup the QuickConnect software which allows for remote access. You don’t have to setup QuickConnect though, and personally, we don’t like any type of software that provides remote access. From a security perspective, we just don’t trust them. It’s not designed insecurely, it’s just that we are very security conscious. At the end, you should end up in a screen similar to the one below:
You’re all done, you’ve successfully gone through the setup and configured your Synology DS220+!
If you need more tutorials to help you get familiar with your new NAS, we recommend the following Getting Started page from Synology.
Conclusion – We love the Synology DS220+, it’s a little rocket!
If you are looking to purchase an entry-level NAS for home use, then the Synology DS220+ is the option to beat. There’s not a lot to be disliked about this machine, other than the 2 bay limitation.
All in all, the pros far outweigh the cons, as this NAS allows for full customization through the native DSM OS, as well as upgradeable hardware. This NAS is perfect for beginners or advanced users, and will allow owners to grow with the machine and change it to suit their needs as time goes on. So head over to Amazon and get it!