Before you can activate the nodes you’ll need to set them up in EVE, follow the EVE-NG guide for that here.
http://www.eve-ng.net/documentation/howto-s/115-howto-add-cisco-wsa-web-security-appliance
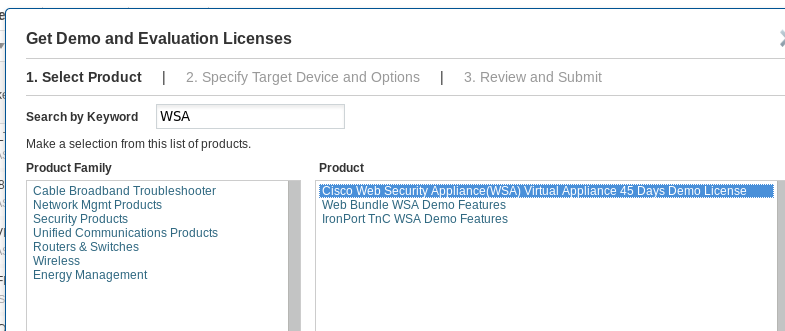
Once you’ve got that complete start your lab up and configure the nodes. Confirm your HTTP/HTTPS reachability before continuing. Now head over to Cisco’s licensing portal and grab some trial licenses of each NODE (45 day licenses). We’ll use these to permanently activate them. You don’t need any contract to be able to do this.

The licenses may take up to 10 minutes to make it to your email. Once you’ve got them in XML format we’ll need to enable FTP on the nodes so you can enter them. Copy and paste of the licenses doesn’t work as there’s not enough buffer in the telnet session for EVE. At least for me that was the issue.
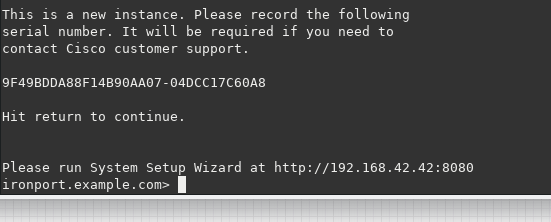
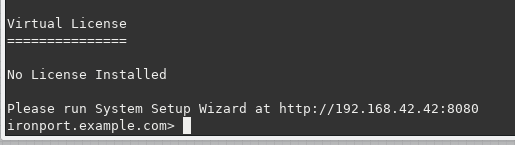
Here’s how to do that, Open up telnet to the node and login with admin/ironport. Notice no license, it won’t let you configure anything meaningful.
Let’s fix that…
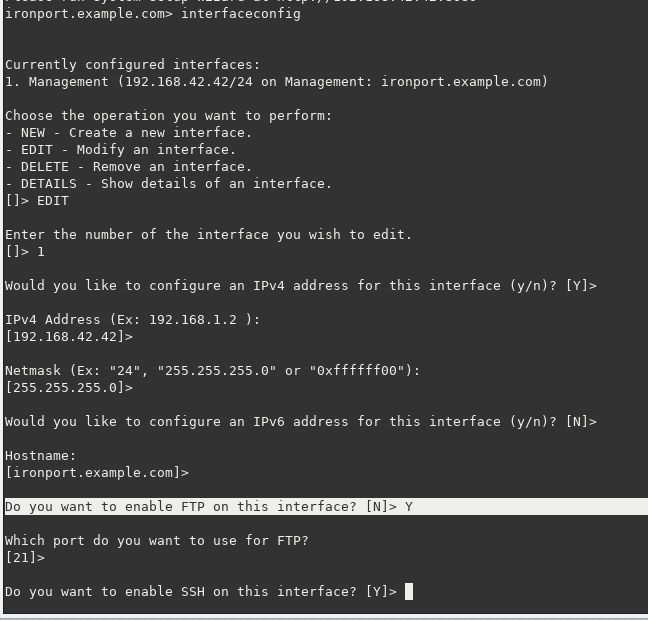
On each node just do “interfaceconfig” and reconfigure the interface with the same IP. Towards the end it will ask if you want to enable FTP, say yes. For every other question you can leave the defaults.
Now you can just FTP over to 192.168.42.42 and drop your license file in the “configuration” directory.
Side tangent:To do that you’ll need IP reachability to the node from an FTP client. I just used a windows 7 VM I had in EVE, but you can bridge EVE to your LAN to do this as well. Here’s how to do that in VMWARE if you wanted to. https://www.petenetlive.com/KB/Article/0001432
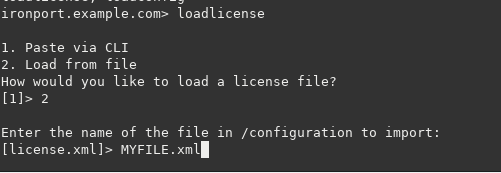
Then back in the CLI you type “loadlicense” then hit 2, and enter your file name.
At this point this point the WSA/ESA/SMA is activated. So now just confirm it via “showlicense”. I won’t show mine.
Now enter “shutdown” to gracefully shut down the VM. SSH into your EVE server, we’ll need to browse to the directory where this image lives. To get that information you need to know your POD, lab ID, and node ID, it’s REALLY easy just follow this.
Once you have that just type “cd /opt/unetlab/tmp/<POD>/<LAB>/<NODE>
Here’s mine:

Now just type “qemu-img commit virtioa.qcow2” and let it finish. At this point the image is saved to the parent, but if you tried to use it it’s not going to work. We need 3 more things…
Since your node is off you should be able to edit it in EVE-NG (in the lab) and grab the UUID.
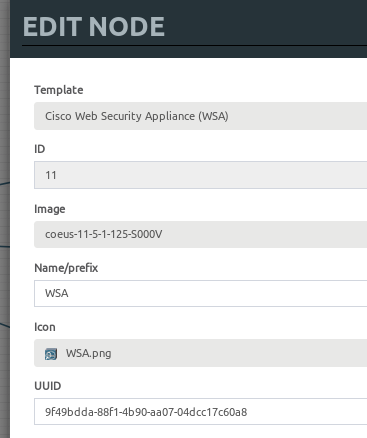
My UUID starts with 9f… Once I have that I can now create new nodes. See the WSA license is tied to the UUID, and the current time. So if you create a new lab with a WSA/ESA/SMA, the UUID and time will be different. That’s why we need to supply new QEMU custom options to each new WSA/ESA/SMA we build in a lab, like this:
-machine type=pc-1.0,accel=kvm -nographic -rtc base=2018-11-15
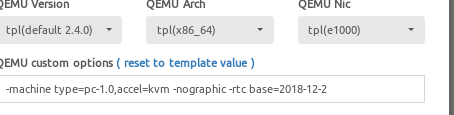
In my case my license started on 11/14 so I just set my VM’s hardware clock to be on 11/15. Then I take my UUID and put it in the UUID section of each new WSA/ESA/SMA I create. The MAC address does not matter to the license. (I was surprised too)
So at this point I have my VM licensed, committed it, I have my VM UUID noted somewhere, and I have my QEMU options for the clock. Now if I create a new lab with a WSA/ESA/SMA I just specify my UUID, specify the rtc base clock, and start my node.