OSPF offers us 4 kinds of authentication when studying the CCNA and CCNP we really only hear/read about 3, the fourth SHA, is fairly new. Here’s the complete list of available authentication for OSPF.
- NULL (no authentication)
- cleartext (packet capture reveals the password)
- MD5 (creates a 128bit fingerprint of the password, click here to read the RFC)
- HMAC-SHA (RFC published in 2009, click here to check it out)
First let’s look at the topology, it’s a simple 3 router topology, all in area 0.
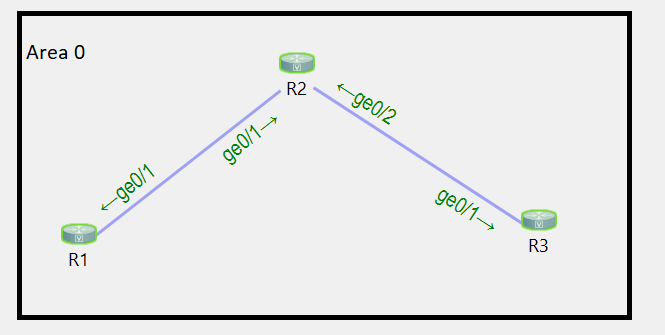
Here’s the current configuration of each router, this is the base config.
R1:
enable
configure terminal
router ospf 1
router-id 1.1.1.1
interface g0/1
ip address 192.168.1.1 255.255.255.0
no shut
ip ospf 1 area 0

R2:
enable
configure terminal
router ospf 1
router-id 2.2.2.2
interface g0/1
ip address 192.168.1.2 255.255.255.0
no shut
ip ospf 1 area 0
exit
interface g0/2
ip address 192.168.2.1 255.255.255.0
no shut
ip ospf 1 area 0

R3:
enable
configure terminal
router ospf 1
router-id 3.3.3.3
interface g0/2
ip address 192.168.2.2 255.255.255.0
no shut
ip ospf 1 area 0
Let’s start off by looking at the OSPF packets when there is no authentication commands configured, just the basic OSPF configuration. This capture is between R1 and R2.
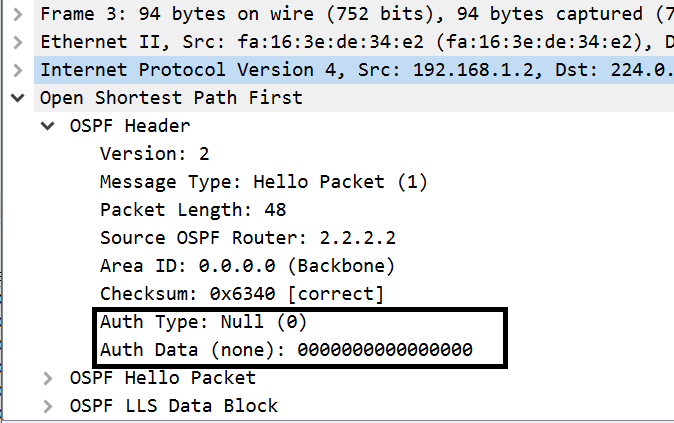
Notice the NULL athentication of type 0. The theoretical risk of such a configuration is that a man in the middle could build adjacencies to your two routers and inject bad routes or inject a default route to steer traffic towards it and capture it. Realistically, what could also happen is you or a tech could misconfigure an OSPF router and bring down the OSPF network, thus we want some type of authentication.
Now let’s enable plain-text authentication, we can do this two different ways. We can either enable it on the area, or use the interface level commands that supersede the area configuration. Let’s start with the area level command.
First let’s just configure it on R1.
enable
configure terminal
router ospf 1
area 0 authentication
Let’s see what happens if we don’t configure the same command on R2.
We should eventually notice that our OSPF adjacency drops and never comes back.
This is because the authentication type flag in the hello packets mismatches.
We can verify this by running the following command on one of the routers.
debug ip ospf adjacency
Here’s what we see when I run it on R2.

Let’s do another packet capture between R1 and R2 to see what the hello packets say.
Here’s the hello from R1 where we configured auth.
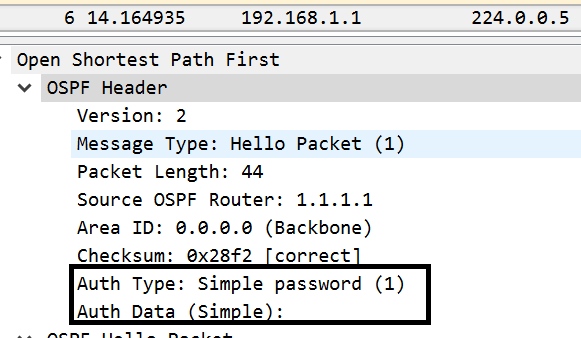
The above shows us that the hello from R1 to R2 includes an authentication type of 1, but no password.
Notice the hello from R2 to R1 does not include any auth, thus a mismatch.
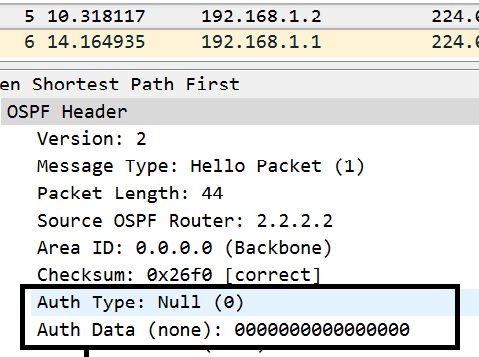
The reason the mismatch is important is because authentication type is one of the matching requirements for an OSPF adjacency to form. Now let’s configure the same authentication type on R2 and R3.
R2:
enable
configure terminal
router ospf 1
area 0 authentication


R3:
enable
configure terminal
router ospf 1
area 0 authentication
Here’s the result of that.

Okay, so the adjacency came back up.
What we could also do is remove the authentication commands from the area and just configure it per interface participating in OSPF. So let’s proceed to clean this up and declare authentication on a per interface basis.
R1:
enable
configure terminal
router ospf 1
no area 0 authentication
exit
int g0/1
ip ospf authentication

R2:
enable
configure terminal
router ospf 1
no area 0 authentication
exit
int g0/1
ip ospf authentication
exit
int g0/2
ip ospf authentication

R3:
enable
configure terminal
router ospf 1
no area 0 authentication
exit
int g0/1
ip ospf authentication
The configuration above produces the same results as the area authentication configuration. We could also now configure different authentication per link if we wanted to. The goal of that scenario was to show you the configuration methods.
Let’s review what just happened.
Scenario 1: Enabled OSPF authentication for the area on 1 router, however did not actually configure authentication.
Result: OSPF adjacency breaks due to mismatch of authentication type in OSPF HELLOs. When we configured it across the board the adjacency came back up.
Scenario 2: Removed area authentication configuration across the board and configured per-interface authentication.
Result: Declaring the are and or interface level authentication types is valid.
Again, be aware that OSPF authentication can be configured at the ospf process level, and interface level. If configured on both, the interface level configuration supersedes the process level config.
Now that the basics are out of the way, let’s configure clear-text and MD5 passwords.
We’ll start by configuring clear-text/plain-text auth between R1 and R2 and no auth between R2 and R3.
R1:
interface GigabitEthernet0/1
 ip ospf authentication
 ip ospf authentication-key password

R2:
interface GigabitEthernet0/1
 ip ospf authentication
 ip ospf authentication-key password
Notice we did not configure the link between R2 and R3 for any actual password. We just configured the link between R1 and R2.
Let’s quickly check out the capture between R1 and R2.
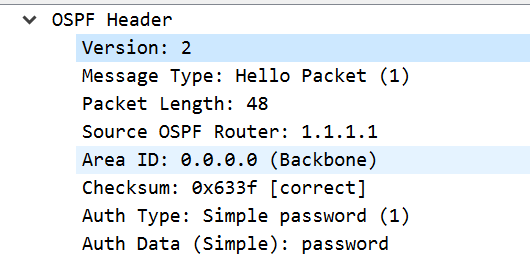
We see our plaintext/cleartext password. Now let’s remove this, and add md5 auth across the area.
A quick note, we can either use the interface specific “ip ospf authentication message-digest” or the process level config “area 0 authentication message-digest”.
R1:
interface g0/1
no ip ospf authentication
no ip ospf authentication-key password
ip ospf authentication message-digest
ip ospf message-digest-key 1 md5 password

R2:
interface g0/1
no ip ospf authentication
no ip ospf authentication-key password
ip ospf authentication message-digest
ip ospf message-digest-key 1 md5 password
exit
interface g0/2
no ip ospf authentication
no ip ospf authentication-key password
ip ospf authentication message-digest
ip ospf message-digest-key 1 md5 password

R3:
interface g0/1
no ip ospf authentication
no ip ospf authentication-key password
ip ospf authentication message-digest
ip ospf message-digest-key 1 md5 password
Here’s the capture between R1 and R2.
Notice the hashed password and type 2. That’s it for MD5.
Now let’s try something new, something the CCNA and CCNP did not teach us. SHA authentication for our adjacency. The RFC I linked to earlier states SHA1 through 512 should be supported.
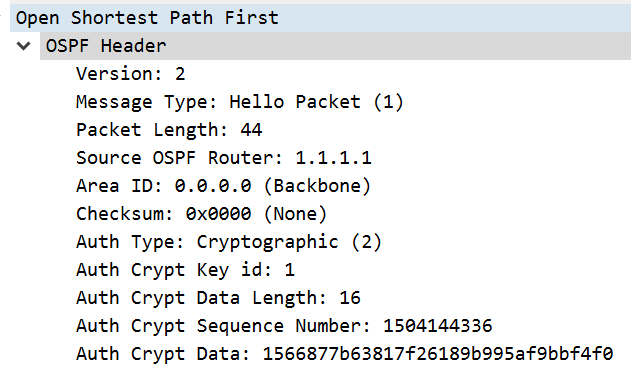
Here’s the configuration for SHA512 authentication.
R1:
conf t
key chain 1
key 1
key-string password
cryptographic-algorithm hmac-sha-512
interface g0/1
no ip ospf authentication message-digest
no ip ospf message-digest-key 1 md5 password
ip ospf authentication
ip ospf authentication key-chain 1

R2:
conf t
key chain 1
key 1
key-string password
cryptographic-algorithm hmac-sha-512
interface g0/1
no ip ospf authentication message-digest
no ip ospf message-digest-key 1 md5 password
ip ospf authentication
ip ospf authentication key-chain 1
exit
interface g0/2
no ip ospf authentication message-digest
no ip ospf message-digest-key 1 md5 password
ip ospf authentication
ip ospf authentication key-chain 1

R3:
conf t
key chain 1
key 1
key-string password
cryptographic-algorithm hmac-sha-512
interface g0/1
no ip ospf authentication message-digest
no ip ospf message-digest-key 1 md5 password
ip ospf authentication
ip ospf authentication key-chain 1
A quick note, the SHA configuration requires using a key-chain. I used a key-chain named “1” and the key 1. These are locally significant, they do NOT need to match across routers. Only the actual passwords need to match so that the hashes match and pass authentication.
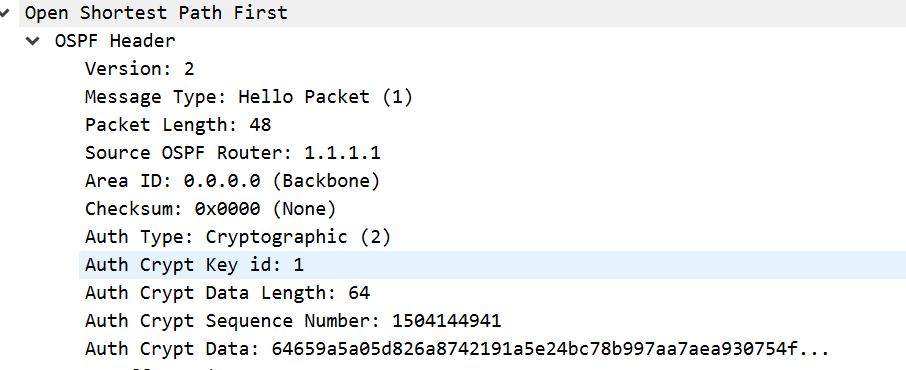
Let’s check out the PCAP, looks very similar to our MD5 one, it’s the same type of auth, however the hash itself is much bigger.
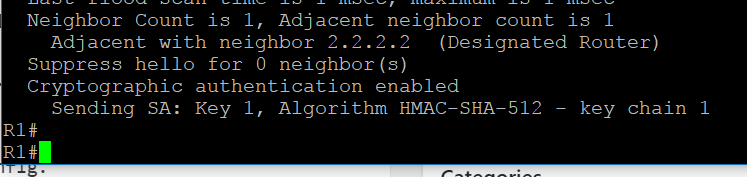
Here’s some verification of OSPF HMAC-SHA-512.
To verify the configuration of authentication run
show ip ospf int g0/1
If you’re interested in the packet captures for viewing, please visit the links below.
https://upw.io/tw/ospf_auth_plain-text_pass_2.pcap
https://upw.io/tx/ospf_auth_sha_512.pcap
https://upw.io/ty/ospf_auth_with_just_1_router.pcap
https://upw.io/tz/ospf_basic_no_auth.pcap
https://upw.io/JI/ospf_md5_auth.pcap
That’s it! This complete guide on how to configure OSPF authentication on Cisco devices is complete!