The goal of this article is to provide you with a pre-built LibreNMS. This image should require very little tinkering, This VM is not meant to be publicly accessibly, it should only be used internally to get you working, feel free to improve it. I’m going to go over the setup in this article.
The VM is based on the latest CentOS 7 x64 image. I’ve tested all of the features before generalizing the config to share.
Download below:
https://upw.io/tD/LibreNMS-Deploy-disk1.vmdk
note: Currently I am rebuilding the OVF/VA so I am just providing a link to download the VMDK so you can import it into vmware and create a new VM from it
Features:
- 1 Minute Polling
- Oxidized Config Backups (with differencing)
- Rsyslog for syslog messages
- Nagios Plugins for service monitoring
- Probably more tinkering done that I forgot
The login info for CentOS is below:
non-root
username: user
password: password
root
username: root
password: password

mysql root
username: root
password: password
The login for LibreNMS:
username: admin
password: password
Locations to mention:
LibreNMS - /opt/librenms
oxidized - /root/.config/oxidized
If you’d like to see the setup guide, please scroll down!
Here is how we can deploy the VM:
1. Here’s the download link again.
https://upw.io/tD/LibreNMS-Deploy-disk1.vmdk
At this point I expect that you have downloaded the vmdk, uploaded it to your ESXi datastore, created a new VM and added this exisiting disk to that VM, then powered it on.
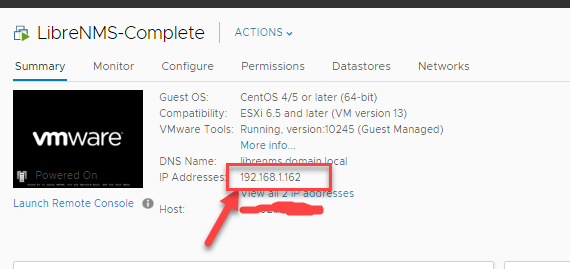
2. Grab the IP of the VM from vSphere (it’s set to DHCP)
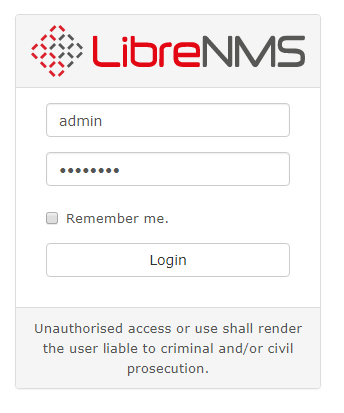
3. Now browse to the IP of the librenms server, and login with the following admin account:
username: admin
password: password
4. Let’s configure a device for SNMP and SYSLOG to verify everything is working. I have a Cisco 3750x switch I will be adding into LibreNMS.

I’m going to quickly go off topic to share the SNMP and logging config for some devices:
Here’s the complete config on the switch side (note x.x.x.x is librenms server ip, y.y.y.y is an NTP server) :
conf t
snmp-server community public
logging origin-id ip
logging trap debug
logging host x.x.x.x

ntp server y.y.y.y prefer
clock timezone CST -6
clock summer-time CDT recurring
ntp source vlan x
service timestamps log datetime localtime
do copy run start
Here’s the logging and snmp config for a Cisco ASA (note x.x.x.x is librenms server IP)
conf t
snmp-server host inside x.x.x.x.x community public
logging enable
logging timestamp
logging buffer-size 200000
logging buffered errors
logging trap errors
logging host inside x.x.x.x
Here’s the logging and snmp config for an ESXI host
esxcli system snmp set --communities public
esxcli system snmp set --enable true

esxcli system syslog config set --loghost='tcp://x.x.x.x:514'
esxcli system syslog reload
Now back to the process
5.
Head back over to LibreNMS and add a device, make sure to configure the hostname. Rsyslog won’t add the logs to the device in Libre if the hostname doesn’t match what’s in libre. Thus you need to add your devices almost always by hostname!
Note:If you don’t add your devices via hostname, and want to capture syslog from devices, you need to find commands that will make devices send you their IP in the syslog payload instead of hostname. The cisco equivalent for this, I believe, is “logging origin-id ip”.

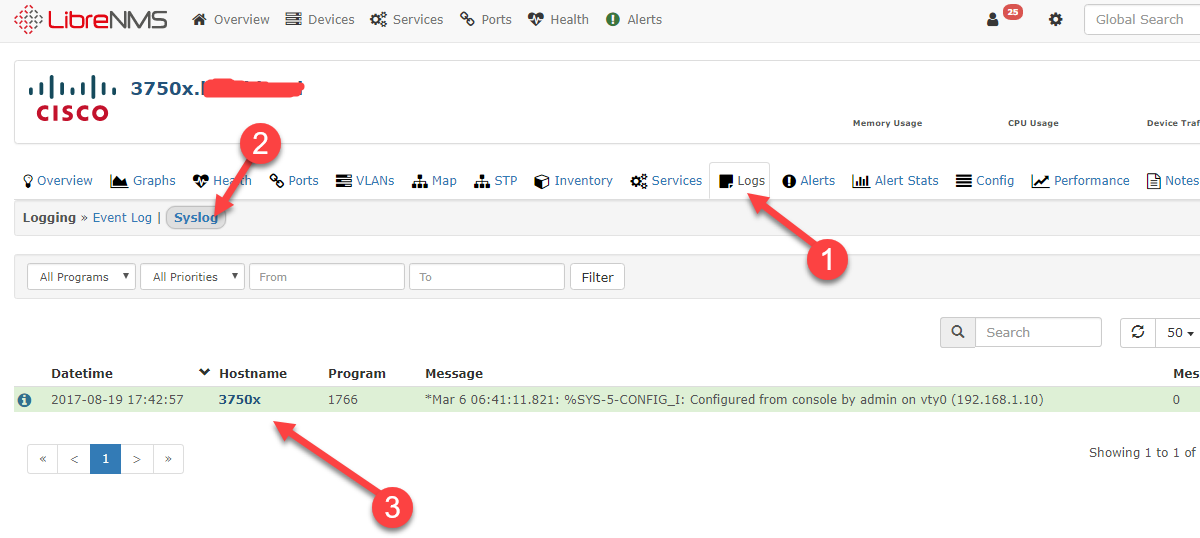
Let’s check the syslog of the switch.
Note: If you are seeing logs, I recommend going back and setting “logging trap error” instead of debugging, or else you will flood the Syslog store and fill it up quickly. Also it will tax the Management plane of your device. This tip becomes more important when you have a chatty firewall filling up your partition with informational syslog. Watch the log size!
6.
Now that that’s working, let’s configure device backups…
SSH or console into the Libreserver, login with root/password, browse to “/root/.config/oxidized/” and edit router.db
cd /root/.config/oxidized/
nano router.db
Note: I left some examples in there of other devices.
let’s add our switch to oxidized so it starts backing it up. Add the following line:
3750x.domain.local:cisco:admin:password
My switch doesn’t require enable, however if it did the syntax would be this.
3750x.domain.local:cisco:admin:password:enablepassword
Save it by pressing CTRL + X, press y, then run the following command
systemctl restart oxidized
Now go back into the device in Libre, and check out the config tab.
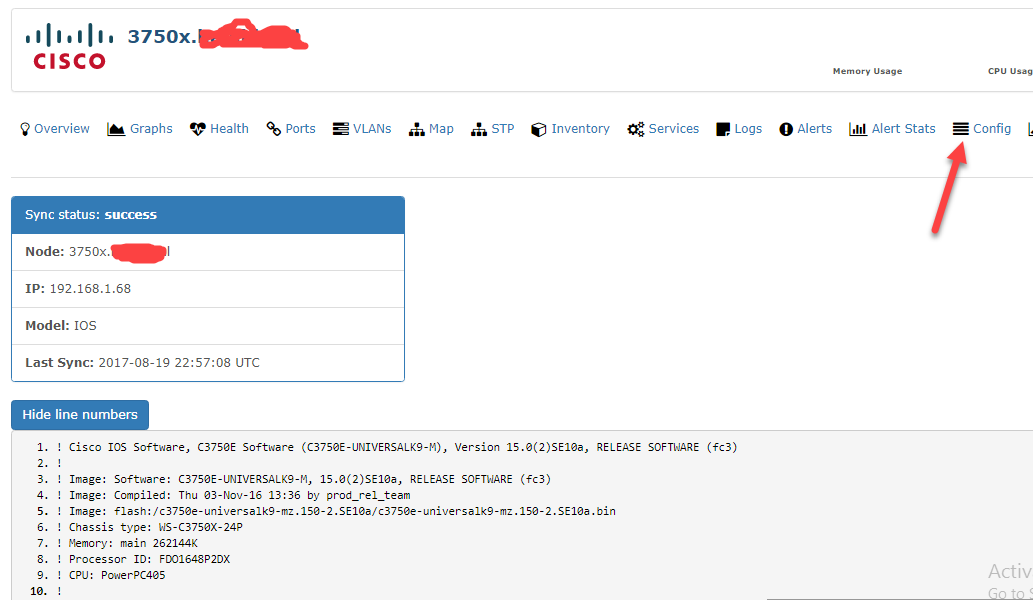
Awesome, the config backup worked! If you change something in the config, save it, Oxidized will pick up the new version as well and allow you to do a difference display since the config is saved in a GIT repo.
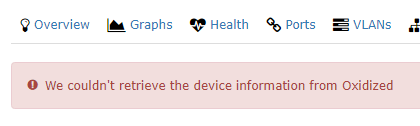
If you get the following, either oxidized is not running, or the hostname/ip in oxidized doesn’t match libre
All should show up green and running. That’s it for now!
If you’re interested in installing your own LibreNMS please check out the official documentation here!
Troubleshooting
1. If you find that something is not working, I would start off by checking if nginx,oxidized,rsyslog and mariadb.
ex:
systemctl status nginx
systemctl status oxidized
systemctl status rsyslog
systemctl status mariadb
2. If you’re worried syslog messages are not making it to your, feel free to use TCPdump, it’s installed on the VM. The following command will allow you to capture the traffic destined for syslog.
tcpdump -i eth0 udp port 514
3. If you’re having more troubles with syslog, the issue might be the hostnames are not matching with the device and libre, please see the excerpt from this post.
Usually the hostname / IP of the syslog doesn’t match what’s in librenms – open syslog.php, uncomment the logfile line, restart rsyslog and then tail -f /opt/librenms/logs/librenms.log see what the data looks like.