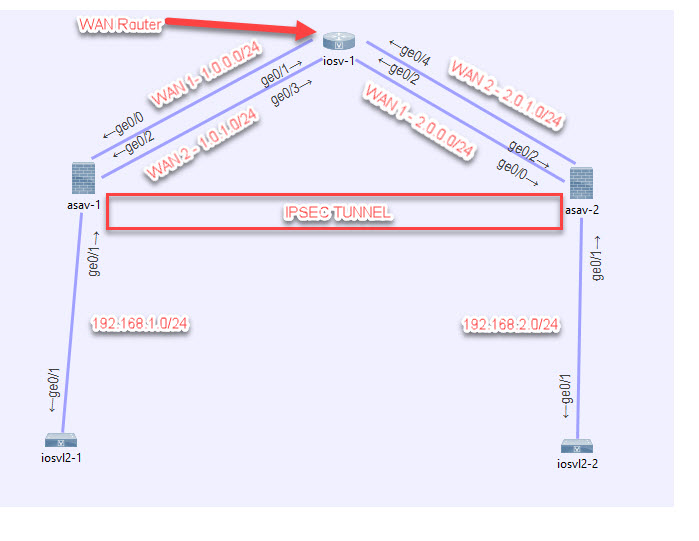
Policy based IPSEC tunneling is probably the most widely used technique to get two offices to communicate securely (at least in the SMB Market).
Today I’m going to discuss how you can configure two ASA’s to failover to their secondary WAN, and then have their tunnels fail over as well.
One should always aim for having two ISPs if the business needs to rely on the tunnel. The question to ask ones self is “If this tunnel goes down, can I continue working?”
If the answer is no, then you need a secondary ISP at a minimum.
I’m going to begin the config for ASAv-1 (left network)…
First let’s get some basic “optimizations” out of the way:
The below allows the asa to keep track of ICMP and let it pass through (does it by IP and expected code reply)
policy-map global_policy

class inspection_default

inspect icmp

inspect icmp error
The first command prevents TCP fragmentation in the future tunnels by clamping the MSS.
The second command preserves session tables if the VPN bounces (quicker recovery).
sysopt connection tcpmss 1350

sysopt connection preserve-vpn-flows
Now let’s configure the LAN and WAN and their security levels.
interface GigabitEthernet0/0
nameif outside
security-level 0
ip address 1.0.0.1 255.255.255.0
!
interface GigabitEthernet0/1
nameif inside
security-level 100
ip address 192.168.1.1 255.255.255.0
!
interface GigabitEthernet0/2
nameif outside2
security-level 0
ip address 1.0.1.1 255.255.255.0
!
Configure an IP SLA monitor to ping google via the first outside interface.
sla monitor 1
type echo protocol ipIcmpEcho 8.8.8.8 interface outside
timeout 6000
frequency 10
sla monitor schedule 1 life forever start-time now
Connect a track object to the IP SLA so we can reference in the route later.
track 1 rtr 1 reachability
Tell the ASA to use Outside as the primary WAN and failover to Outside2 when the track object fails.
route outside 0.0.0.0 0.0.0.0 1.0.0.2 1 track 1
route outside2 0.0.0.0 0.0.0.0 1.0.1.2 2
Configure basic dynamic PAT for both WAN interfaces.
nat (inside,outside) after-auto source dynamic any interface
nat (inside,outside2) after-auto source dynamic any interface
Now let’s configure the VPN:
Enable ikev1 listening on both WAN interfaces.
crypto ikev1 enable outside
crypto ikev1 enable outside2
Set our preferred IKE policy for all VPNs.
crypto ikev1 policy 1
authentication pre-share
encryption aes-256
hash sha
group 2
lifetime 86400
Create the tunnel groups for both WAN links on the other side, with the same shared secret.
tunnel-group 2.0.0.1 type ipsec-l2l
tunnel-group 2.0.0.1 ipsec-attributes
ikev1 pre-shared-key password
tunnel-group 2.0.1.1 type ipsec-l2l
tunnel-group 2.0.1.1 ipsec-attributes
ikev1 pre-shared-key password
Configure the ACL for matching the traffic to be protected.
object network lan
subnet 192.168.1.0 255.255.255.0
object network remote
subnet 192.168.2.0 255.255.255.0
access-list vpn extended permit ip object lan object remote
Configure the IPSEC encryption parameters.
crypto ipsec ikev1 transform-set myset esp-aes-256 esp-sha-hmac
Configure the crypto map for the tunnel, with two peers, then add it to both WAN interfaces.
crypto map vpn_map 10 match address vpn
crypto map vpn_map 10 set peer 2.0.0.1 2.0.1.1
crypto map vpn_map 10 set ikev1 transform-set myset

crypto map vpn_map interface outside
crypto map vpn_map interface outside2
Finally configure the identity NAT so that the traffic traverses properly.
nat (inside,outside) source static lan lan destination static remote remote no-proxy-arp route-lookup
nat (inside,outside2) source static lan lan destination static remote remote no-proxy-arp route-lookup
Now let’s configure the right network’s ASA. I will put that whole config down here since it’s basically a mirror.
!
interface GigabitEthernet0/0
 nameif outside
 security-level 0
 ip address 2.0.0.1 255.255.255.0
!
interface GigabitEthernet0/1
 nameif inside
 security-level 100
 ip address 192.168.2.1 255.255.255.0
!
interface GigabitEthernet0/2
 nameif outside2
 security-level 0
 ip address 2.0.1.1 255.255.255.0
!

object network lan
 subnet 192.168.2.0 255.255.255.0
object network remote
 subnet 192.168.1.0 255.255.255.0
access-list vpn extended permit ip object lan object remote


nat (inside,outside) source static lan lan destination static remote remote no-proxy-arp route-lookup
nat (inside,outside2) source static lan lan destination static remote remote no-proxy-arp route-lookup
!
nat (inside,outside) after-auto source dynamic any interface
nat (inside,outside2) after-auto source dynamic any interface

route outside 0.0.0.0 0.0.0.0 2.0.0.2 1 track 1
route outside2 0.0.0.0 0.0.0.0 2.0.1.2 2

sysopt connection tcpmss 1350
sysopt connection preserve-vpn-flows

sla monitor 1
 type echo protocol ipIcmpEcho 8.8.8.8 interface outside
 timeout 6000
 frequency 10
sla monitor schedule 1 life forever start-time now

crypto ipsec ikev1 transform-set myset esp-aes-256 esp-sha-hmac

crypto map vpn_map 10 match address vpn
crypto map vpn_map 10 set peer 1.0.0.1 1.0.1.1
crypto map vpn_map 10 set ikev1 transform-set myset
crypto map vpn_map interface outside
crypto map vpn_map interface outside2

crypto ikev1 enable outside
crypto ikev1 enable outside2
crypto ikev1 policy 1
 authentication pre-share
 encryption aes-256
 hash sha
 group 2
 lifetime 86400
!
track 1 rtr 1 reachability
tunnel-group 1.0.0.1 type ipsec-l2l
tunnel-group 1.0.0.1 ipsec-attributes
 ikev1 pre-shared-key *****
tunnel-group 1.0.1.1 type ipsec-l2l
tunnel-group 1.0.1.1 ipsec-attributes
 ikev1 pre-shared-key *****

policy-map global_policy
 class inspection_default
  inspect icmp
  inspect icmp error
Use the “show vpn-sessiondb l2l” command to view the status of the tunnel, like below.
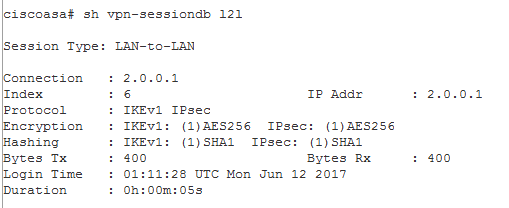
A healthy tunnel will have both TX and RX Bytes showing.
An unhealthy tunnel will either show “There are presently no active sessions” or it might show some TX or RX, but not both.
It also helps of course to just ping across the tunnel, here I am pinging from 2.10 to 1.10.

Ok now let’s initiate some failover and test:
Shut down the primary WAN on ASA 2 (right network). Let’s confirm which interface that is:
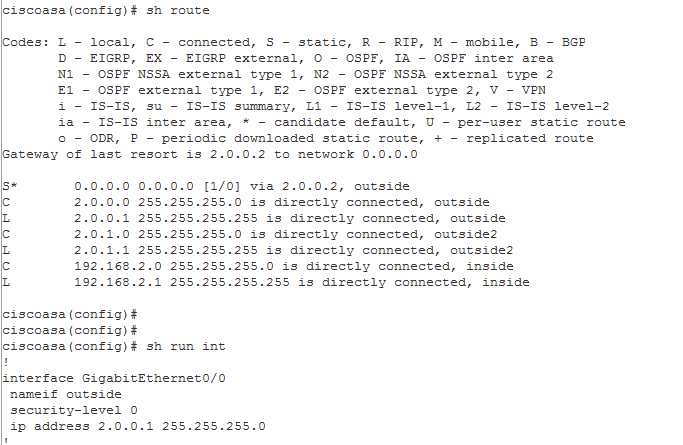
Perfect, looks to be G0/0 as we expected.
Run this debug command to confirm IPSEC failover.
debug crypto ipsec 128
Ok now shut off int g0/0.

Ok let’s confirm the track object did its job and failed over to our static default route with an AD of 2.
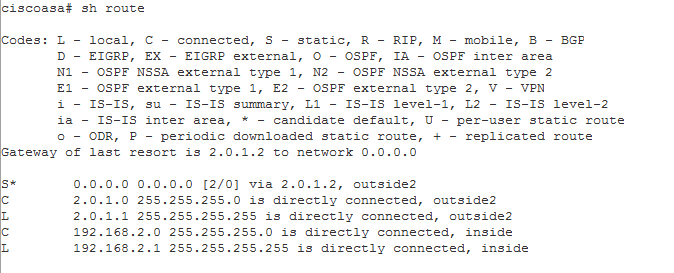
Yup, looks like we are good there.
Now If I ping again from 2.10 to 1.10 the tunnel should renegotiate.

We also would see these decrypt messages from the ASA.
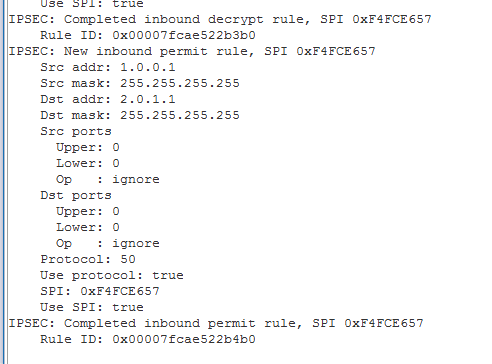
Perfect the failover worked. Now do an “undebug all” in global config mode to return the ASA back to normal.